Developing Custom Widgets
For more detailed information, see ArcGIS WebApp Builder Developer’s Guide > Widget Development.
Custom Widget File Structure and Naming Convention
Use the following ESRI-based conventions when naming your custom widget files:
| Component | File naming convention | Custom Widget Folder | |
|---|---|---|---|
| Custom widget class | Widget.js | root | |
| Custom Widget template (widget UI) | Widget.html | root | |
| Custom Widget Configuration file | config.json | root | |
|
Custom Widget I18N file For more information, see Dojo’s documentation. |
strings.js | nls | |
| Custom Widget locale file | strings.js | nls/{language} | |
| Custom Widget style files | Right layout | style.css | css |
| Left layout | style.css | css | |
| Custom theme | {theme}.css | css | |
| Style images | css/images | ||
| Custom Widget icon files | Daily site | icon.png | images |
| Admin site | iconAdmin.png | images | |
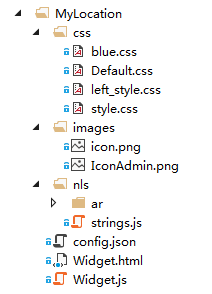
The following diagram shows a sample custom widget file structure:

Extending the BaseWidget Class
The standard map widgets are built on Esri’s ArcGIS WebApp Builder widget framework.
Similarly, a custom map widget must also be built upon the same ArcGIS widget framework. To
develop a custom widget, create a JavaScript subclass of BaseWidget. By
extending BaseWidget, your custom widget will be managed by ArcGIS WebApp
Builder’s WidgetManager as a deployable widget.
A widget’s user interaction elements consist of panels (for displaying widget contents) and themes (for display schemes). For an overview about widgets, panels, and themes, see ArcGIS WebApp Builder Developer’s Guide > Overview.
The ArcGIS Web AppBuilder defines the BaseWidget class and provides helper Dojo functions
for extending BaseWidget to create a custom widget, Widget.js.
Create and edit the Widget.js file with the following code:
define(['dojo/_base/declare', 'jimu/BaseWidget'],
function(declare, BaseWidget) {
  //To create a widget, you need to derive from BaseWidget.
  return declare([BaseWidget], {
    // Custom widget code goes here
  });
});
Enter the custom widget code within the declare code block.
Custom Widget UI
A custom widget’s UI is defined in Widget.html. Create and edit the Widget.html file with the following template html code: [CW: please use the scrollable text box for the sample code]
<div>
  <div>I am a demo custom widget.</div>
</div>
Above is a simple demo code for custom widget template,
and below is a more complex custom widget template:
     <div>
        <div id="search"></div>
        <div class="linkContainer">
        <span class="common bookmarks" id="bookmarks" data-dojo-attach-event="onclick:_expandBookmark">
        ${nls.bookmarks}</span>
        <span class="common myLocation" id="locationBrowser" title="Use my browser location">
        ${nls.useBrowser}</span>
        </div>
        <div id="dijitLocateButton"></div>
        <div class="esriGeocoderClearFloat" role="presentation"></div>
        <div style="display:none">
        <input type="hidden" id="hidCurrBookmarkName" value="" />
        <input type="button" id="btnBookmarkEnter" data-dojo-attach-event="onclick:_onBookmarkClick" />
        <input type="button" id="btnBookmarkDel" data-dojo-attach-event="onclick:_onDeleteBtnClicked" />
        </div>
        <div id="gis_bookmarks" style="display:none">
        <div id="gis_bookmarks_header">
        <input data-dojo-attach-point="bookmarkName" type="text" placeholder="bookmark name" />
        <span class="gis-bookmarks-header-add" data-dojo-attach-point="btnAddBookmark"
        data-dojo-attach-event="onclick:_onAddBtnClicked">Add</span>
        <span data-dojo-attach-point="errorNode"></span>
        </div>
        <div data-dojo-attach-point="bookmarkList">
        </div>
        </div>
    </div>
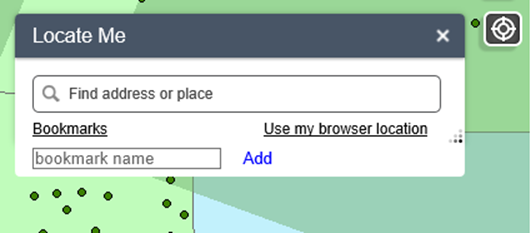
The following diagram shows the custom widget UI created by the template HTML:

Internationalization Support
To support internationalization, abstract UI labels by creating string labels in a separate language-specific strings.js file, and reference the string label by its label ID.
Create and edit the nls/strings.js file with the default string labels and literals. In this example, English is used in the default string labels and Arabic (“ar”) is the supported language:
define({
   root:{
      label1: "I am a demo widget.",
      label2: "This is configurable."
   },
   "ar": true
});
To support a specific language, create a folder under {CustomWidget}/nls/{language} where {language} is the language code such as en, fr, ru, etc. Copy the nls/strings.js file into the nls/{language} folder. For the sample nls/strings.js above, create the subfolder nls/ar and the nls/ar/strings.js file. Edit nls/ar/strings.js with the following sample code. In this example, Arabic (“ar”) is the supported language:
define({
   label1 : "أنا القطعة تجريبي",
   label2 : "هذا هو شكلي"}
);
In Widget.html UI file, replace the hard-coded UI labels with references to the nls string label:
<div>
   <div>${nls.label1}.</div>
   <div>${nls.label2}.[${configData.configText}]</div>
</div>
Reload the map application with the custom widget using the URL locale parameter, for example, locale=AR. Alternatively, you can change the browser’s locale configuration.
Custom Widget Properties and Methods
The following are pre-defined custom widget properties:
| Property | Description |
|---|---|
| config | Custom widget configuration |
| currentActiveWidget | Current active widget |
| appConfig | Configuration for all of AGIS widgets |
| baseClass | Container class name for custom widget. Default name is accelajs-widgets |
| id | Custom widget id |
| label | Custom widget label |
| map | AGIS map instance |
| name | Name of custom widget. |
The following are pre-defined custom widget properties:
| Method | Description |
|---|---|
| setMap(map) | Set AGIS map instance for custom widget. |
| setCurrentActiveWidget(activeStatus) | Set status for custom widget. |
| onOpen() | This function will be called when widget panel is opened. |
| onClose() | This function will be called when widget panel is closed. |
| enabledInfoWindow() | Enable pop up AGIS information window. This method is for resolving event conflict with pop up AGIS tip window. |
| disabledInfoWindow() | Disable pop up AGIS information window. |